Materials $70, Labor $180, Permits $150, Delivery/Disposal $15, Taxes $20. Premium: outdoor waterproof boxes, multiple circuits, conduit runs, full inspection. Assumptions: region, specs, labor hours. Specs: three boxes, 4 hours labor, outdoor install . Homeowners typically pay a broad range for electrical box installation, driven by box type, wiring complexity, and local labor rates. This guide covers cost, price ranges, and practical budgeting for standard electrical box installation projects. The price depends on electrical code upgrades, permit. Posted on April 27, 2025 at 7:29 am. Main cost drivers include material quality, box size, wiring complexity, and permit requirements. A clear cost estimate helps plan budgets and avoid surprises. Cost ranges summarize typical. Distribution box cost encompasses various factors that influence the overall investment in electrical distribution systems. A distribution box serves as a crucial component in electrical installations, housing circuit breakers, fuses, and other protective devices that ensure safe power distribution. An estimate is only as good as the information it is based on, and the NECA Manual of Labor Units (MLU) has been the estimating resource of choice for electrical contractors since 1923.
[PDF]
The operation and skills of fiber optic fusion splicing technology can be mainly divided into five steps: fiber stripping, fiber cutting, fiber melting, fiber sleeve, and fiber winding. In this guide, we cover the basics of fiber optic splicing, how to perform splicing using two different methods, and finally some best practices to perform good fiber splicing. What is Fiber Optic Splicing and Why is it Needed? – #1. And tools used for fiber fusion: fusion splicer; fiber cleaver; cable stripper; fiber optic stripper; alcohol;. Splicing fiber optic cable is an extremely important phase for making dependable, high-speed communication infrastructures. Regardless of the type of fiber network you're deploying, be it for telecom, enterprise data centers, or smart city infrastructure, fusion splicing provides the benefits of. While a cut or damaged fiber optic cable can temporarily take your network down, it is possible to quickly fix the cable with the right tools. In this video, we walk through the essential steps of preparing and splicing a fiber optic cable. Watch the complete process, from carefully stripping the fiber coating and performing a precision cleave, to loading the prepared fiber into the fusion splicer for a perfect alignment. Before jumping into the physical steps, it's important to understand the two primary methods of fiber splicing: fusion splicing and.
[PDF]

High Initial Investment Costs:The transition to LED and smart lighting systems involves substantial upfront costs, estimated at around $1. 5 billion for large-scale implementations in South Korea. The South Korea Lighting Distribution Cabinet Market was valued at 8. 04 billion in 2025 and is projected to grow at a CAGR of 6. 17% from 2026 to 2033, reaching an estimated 12. This expansion is fueled by rising demand across industrial, commercial, and technology-driven. The South Korea LED and Smart City Lighting Market, valued at USD 1. 7 billion, is growing due to demand for IoT-enabled systems, energy savings, and urban development in cities like Seoul and Busan. 7 billion, based on a. Market Forecast By Offering (Hardware, Software, Services), By Installation Type (New Installations, Retrofit Installations), By End Use Application (Indoor, Outdoor), By Communication Technology (Wired, Wireless) And Competitive Landscape The South Korea smart lighting market is experiencing. Find local businesses, view maps and get driving directions in Google Maps. Market segmentation highlights a preference for hanging cabinets, likely due to space efficiency. 15 million by 2026–31, driven by smart city pilots and commercial modernization. The evolution of South Korea's smart lighting market is rooted in the country's early nationwide commitment to digital infrastructure.
[PDF]

Step-by-step instructions on how to install the Polylok 12" distribution or drainage box. In this guide, we'll break down everything you need to know to install a distribution box correctly and confidently. Choose the right box based on environment (indoor/outdoor), load capacity, and durability. Check for proper IP/NEMA ratings and material quality. Ensure safe placement: install in. Before starting the installation, finding a proper place for putting the distribution box is crucial, because it largely decides the safety and convenience of maintenance. Let's see what factors need to be taken care of when choosing the installation place. Accessibility is one of the most. Learn how to wire a distribution box step by step! This video shows real on-site footage of electrical installation, demonstrating safe and standardized wiring methods used by professionals. We'll simplify technical jargon, highlight common pitfalls, and equip you with actionable insights—because your safety and. To install one, you'll need to strip the ends off all the wires that will be in the box. To complete the electrical circuit, tie together the same-colored wires and hold them in place with wire nuts. Be sure to take the proper precautions so your home can be safely supplied with electricity for.
[PDF]
Lubricate your blade and cut following the angle of the circle impressions. Slide the seal into place from inside of the D-Box and tighten nut from the outside. Check to make sure you have completely tightened the nut and that the seal is not loose on the D-Box. How to install and utilize the pipe seals that come with the Polylok distribution boxes. Covers wiring, placement, standards, and expert tips for a compliant setup. A distribution box is the heart of any electrical system. It takes the incoming power and safely distributes it to different circuits throughout your building. more Polylok offers the only catch basin and distribution box seal on the market that accepts. Whether you are an electrical contractor or a construction brigade, knowing how to properly and safely install distribution boxes is the basis of ensuring the safe operation of the entire system. To open the seal tabs us a key or.
[PDF]

The first thing you should do is locate the fiber optic cable that comes from the service provider. Once inserted, make sure it is securely. However, setting up a fiber optic connection to your router can seem daunting if you're unfamiliar with the process. This comprehensive guide combines industry standards with field-tested practices to ensure you achieve a rock-solid. Setting up a fiber internet connection requires understanding key hardware components and following a specific connection sequence to establish your home network. This guide details the necessary physical and digital steps to connect your fiber line and activate your internet service. The fiber. In this article we'll break down how fiber internet is installed - from the network fiber drop outside your house to the in-home setup with your router and gateway - and what you should expect at each stage. Fiber optic internet is generally installed in the following 5 steps, which we'll dive. Follow along as we take you through the step-by-step process of installing fiber internet! From preparing the site to connecting the final cables, we'll show you what goes into bringing high-speed internet to your doorstep. Whether you're a tech enthusiast or just curious about how it all w. Here's a step-by-step guide to help you through it. Understand the Basics Before diving in, familiarize yourself with the components involved:.
[PDF]
Many engineers don't know how to install this accessory. With the latest design, it can be confusing. So here is the instruction: 1. Determine the right height and the quantity of mounting bracket needed 2. Fix it on the gland. Distribution box installation How we make electrical enclosure more Easier DIY tool at home This DIY Woodworking Tool Changes Everything. If provided, proper installation of an equipment grounding terminal must be made and the rack must be grounded in accordance with NFPA 70, NEC, and the applicable sections of ANSI C2, “National Electrical Safety Code. " The equipment shall be installed by trained service personnel. All parts such as. Embarking on a Unistrut installation project can be both exciting and daunting. Whether you're venturing into medical support systems, ceiling grids, roof walks, or catwalks, ensuring a seamless installation requires careful planning and execution. In this guide, we'll delve into some expert tips. Whether you are an electrical contractor or a construction brigade, knowing how to properly and safely install distribution boxes is the basis of ensuring the safe operation of the entire system. This article details the process of installing them, which helps you comprehend distribution boxes. Before you buy electrical boxes, you want to be certain they have the right mounting holes for the devices you plan to install. Also be sure the boxes have correctly placed.
[PDF]

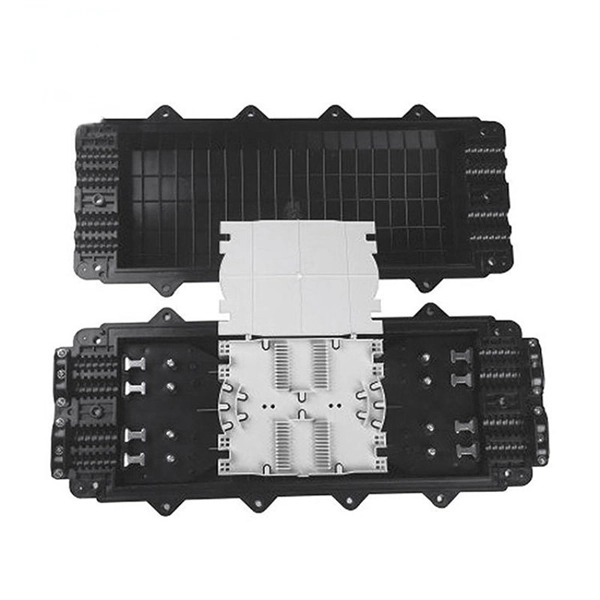
Learn how to install fiber splice trays inside an enclosure step by step. Quick, easy, and essential for fiber pigtail management! https://bit. Unlike fiber connectors, which can be plugged and unplugged, splicing creates a fixed connection that is typically more stable and has lower insertion. This document describes the installation of optical fiber with both single fiber and/or ribbon fiber splices into Optical Splice Enclosure (OSE) metal splice trays (Figure 1). Make sure you read and understand this instruction as well as instructions provided with related assemblies before. By following these detailed steps, the installation of your Fiber Splice Closure will be secure, organized, and maintained, ensuring high performance and longevity of your fiber optic network. Installing a fiber optic splice closure efficiently and effectively requires attention to detail and. How to install the splitter distribution box is the important information we need to know. This article includes the following: 1. Install the fixture 2. Box installation and fixed splitter distribution box 4. Install. Page 5 B (# 7 & 8) enter splice tray # 2. Route the fibers entering the splice tray up to splice point as shown. NOTE : Protection tube from side A enters splice tray from the far end as shown After splicing, close the splice tray and lock the front cover properly with the main and side lock.
[PDF]
This ultimate guide explains what a distribution box does, its internal components, common types, real-world applications, and how to select the right DB Box for your project. A distribution boxes is an essential device that manages the safe and efficient flow of electrical power throughout different areas of a building or facility. It is commonly used in homes, offices, and industrial settings to control and protect electrical circuits. Inside, you'll find parts like circuit breakers and fuses that protect the system from problems like overloads and short circuits. By knowing their great. A well-chosen and properly installed distribution box can prevent electrical hazards, reduce downtime, and ensure your electrical system operates smoothly for years to come. Let's explore how these critical components work and why they deserve your attention. A distribution box, also known as a. The internal structure of the distribution box is designed to safely distribute power from the main power source to multiple branch circuits. We also highlight how reliable manufacturers like NUOMAK support stable, compliant, and cost-effective power distribution.
[PDF]
These server racks are easy to build and made from materials you can find at just about any hardware store. Build a secure and sturdy server rack that fits all your equipment without spending so much money. Build your own home server rack with these 6 DIY plans. From wood to metal designs, learn how to organize your network gear efficiently and save money today. Whether. In this regard, These DIY server rack plans will help you build a server rack for your home or business. From wooden server racks to compact soundproof cabinets, we have something for everyone – no matter your skill level or space requirements. Our collection of DIY server rack plans features step-by-step. Building your own DIY server rack is an empowering project that offers customization not found in pre-built options. Make a rough list of components I want for my rack. Calculate how much rack height and depth I'll need for those components. This guide walks you through the full process, from choosing.
[PDF]

And fixed the frame on the front door position with 4 M5*8 self-tapping screws. 2, Use 16 M8*12 inner hex round screws and M8 flange nut for fixing the top & bottom panels into two side frames. 4, Insert back panel. Follow the instructions in this section to remove and install the side panels. Insert the key that comes with the rack cabinet into the key hole on the side panel, and turn it clockwise to unlock. If an IT cabinet is not equipped with side panels and placed in the end position, side panels need to be installed to ensure that the outer side of an end cabinet has side panels. Mark the mounting hole positions for the end cabinet based on the mounting holes in the cabinet side panel, and install. Complete Assembly Procesure for 9U Wall Mounted Network Cabinet (Single Section) How to assemble a wall-mounted network cabinet? 1, Insert top and bottom panel into the side frames. more How to assemble a wall-mounted. Installing and setting up a network cabinet system correctly is essential for maintaining an efficient and organized network infrastructure. In this comprehensive guide, we will walk you through the step-by-step process to ensure a successful installation and setup of your network cabinet system. Page 3 M3. 5 Attach Back Panel (H) to the rear of the cabinet frame,using M3. Click Side Panels (E) into place. To install the Tempered Glass Door (G), locate the side with two pins. Insert the fixed pin into door hinge hole. Pre – installation.
[PDF]

See this topic to learn how to remove and install a door. Unlock and open the door. Removing a door Hold the door in place, and lift both hinge pins until they lock in the open position so that the door is disengaged. Remove the door from the rack cabinet frame. Install. Before installing your server in a rack cabinet, review the following guidelines: Two or more people are required to install the device in a rack cabinet. Ensure that the room air temperature is below 35°C (95°F). Do not block any air vents; usually 15 cm (6 in. ) of space provides proper airflow. In this comprehensive guide, we will walk you through the step-by-step process to ensure a successful installation and setup of your network cabinet system. Key steps include measuring the installation area, mounting rails, organizing cables, and testing stability. Proper grounding and compliance with safety. Page 3 M3. Click Side Panels (E) into place. To install the Tempered Glass Door (G), locate the side with two pins. With your thumb, pull down on the spring pin and slide it. Complete Assembly Procedure for 9U Wall Mounted Network Cabinet (Double Section) How to assemble a double section wall mounted network cabinet server rack? 1, Insert top and bottom panels into the side frames. And fixed the frame on the front door position with 4 M5*8 self-tapping screws.
[PDF]

This page offers free downloadable designs for building your own light bridge that is placed over your track's finish line. This design uses infrared (IR) LEDs that illuminate the finish line sensors embedded in the track. Designs are available for 2, 3, 4 or 6 lane. Track lighting is a fantastic choice for homeowners looking for flexibility and modern style. Unlike traditional ceiling lights that cast a fixed pool of light, track systems offer adjustable heads that can be aimed precisely where you need them. Barry Zakar is a professional handyman and the founder of Little Red Truck Home Services based in the San Francisco Bay Area. With over ten years of experience, Barry specializes in a variety of carpentry projects. This step-by-step guide shows how to safely install track lighting, connect wiring, and position fixtures for the best results. To install track lighting, turn off power at the breaker, connect the. Poor Man's Track Lighting: What do you get when you cross a dimmer switch, a curtain rod, an extension cord and 5 clamp lights? Cheap, practical and adjustable track lighting! Here is a simple and quick way to make highly adjustable ceiling lighting for under $50. Follow these easy to follow instructions and we can help you light your space with flexible track lighting. more Audio tracks for some languages were automatically generated.
[PDF]