
And fixed the frame on the front door position with 4 M5*8 self-tapping screws. 2, Use 16 M8*12 inner hex round screws and M8 flange nut for fixing the top & bottom panels into two side frames. 4, Insert back panel. Follow the instructions in this section to remove and install the side panels. Insert the key that comes with the rack cabinet into the key hole on the side panel, and turn it clockwise to unlock. If an IT cabinet is not equipped with side panels and placed in the end position, side panels need to be installed to ensure that the outer side of an end cabinet has side panels. Mark the mounting hole positions for the end cabinet based on the mounting holes in the cabinet side panel, and install. Complete Assembly Procesure for 9U Wall Mounted Network Cabinet (Single Section) How to assemble a wall-mounted network cabinet? 1, Insert top and bottom panel into the side frames. more How to assemble a wall-mounted. Installing and setting up a network cabinet system correctly is essential for maintaining an efficient and organized network infrastructure. In this comprehensive guide, we will walk you through the step-by-step process to ensure a successful installation and setup of your network cabinet system. Page 3 M3. 5 Attach Back Panel (H) to the rear of the cabinet frame,using M3. Click Side Panels (E) into place. To install the Tempered Glass Door (G), locate the side with two pins. Insert the fixed pin into door hinge hole. Pre – installation.
[PDF]
A lighting control module operates as the central controller for a lighting system. It receives input from switches, apps, or sensors and regulates electrical flow to connected lights. Depending on the setup, it adjusts brightness, color temperature, or full lighting scenes. It acts as a bridge between your physical lighting fixtures and the smart systems that manage them. Instead of relying solely on traditional wall switches, you can control your lights via remotes, mobile or web apps. A lighting control module is an essential component in a lighting control system that manages how lights are powered, dimmed, or switched on and off. Think of it as the “brain” that receives commands—either from a manual switch, a sensor, or a building automation system—and translates them into. A lighting control module is a smart device that manages lighting circuits, adjusting brightness, automating schedules, and responding to sensors. It enhances comfort, efficiency, and ambience in homes and commercial spaces. Explore the multifaceted benefits and applications of lighting control modules, from home automation to industrial. These modules are designed to communicate with various sensors, switches, and control panels, making lighting adaptable to different environments and user preferences. It enables precise management of lighting systems, allowing for adjustments in brightness, color, timing, and even integration with other smart devices. This innovation.
[PDF]

In this video we will learn how to configure cisco core switch active active using HSRP step by step. In this LAB we practice on creating vlan, distribute vlan to other switch in our network, creating interface vlan and assign IP address for layer 3 routing. Follow these simple best practices to set up a new network switch. Just like riding a bicycle, nobody's born knowing how to setup a network switch. And this process is a little more advanced than, say, setting up your home Internet or even a plug-and-play type switch. But, with the right guidance. Looking to configure a Cisco switch for the first time? If the answer is YES, you're in the right place. You're going to configure: SSH access with local AAA authentication. Here's a network diagram, so you can follow. When you deploy a new switch, it's important to configure it properly to ensure optimal performance, security, and functionality. It comes with an IOS. An IOS is a Cisco proprietary operating system. It allows you to configure, customize, and use Cisco devices as needed. It includes thousands of commands for various tasks. This tutorial explains essential. Although a Cisco switch is a much simpler network device compared with other devices (such as routers and firewalls for example), many people have difficulties to configure a Cisco Catalyst Switch. Configuring a Cisco switch is a fundamental task for network administrators, as it lays the groundwork for.
[PDF]

It transforms high volumes of electrical signals into optical signals for transmission over fiber cables, or reverses the process at the receiving end. Think of it like a Type-C to USB adapter in everyday tech—its core function is seamless conversion between electrical and optical. Optical modules are compact devices that convert electrical signals into optical signals and vice versa. They are used in fiber optic communication systems to transmit data over long distances with minimal loss and interference. These modules typically consist of a laser or LED transmitter, a. In the world of fiber optic communications, optical transceiver modules play a pivotal role as interfaces that convert electrical signals to optical signals and vice versa. An optical module works at the physical layer of the OSI model and is one of the core components in the fiber communication. The frequency response characterization of these electrical-to-optical (E/O, modulators sometimes integrated with lasers) and optical-to-electrical (O/E, photo detectors and receivers) converters can be important in terms of such parameters as bandwidth, flatness, phase linearity and group delay. The optical module serves as a crucial component in optical fiber communication systems, operating at the physical layer, which is the lowest layer in the OSI model. Among various optical module form factors, SFP (Small Form-Factor Pluggable).
[PDF]
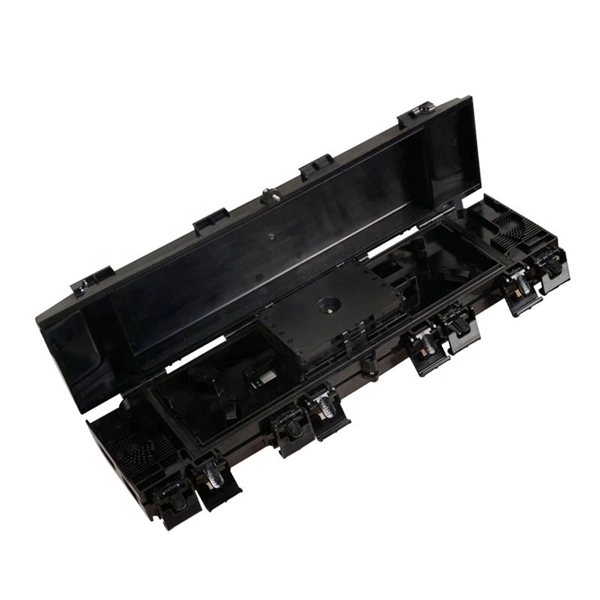
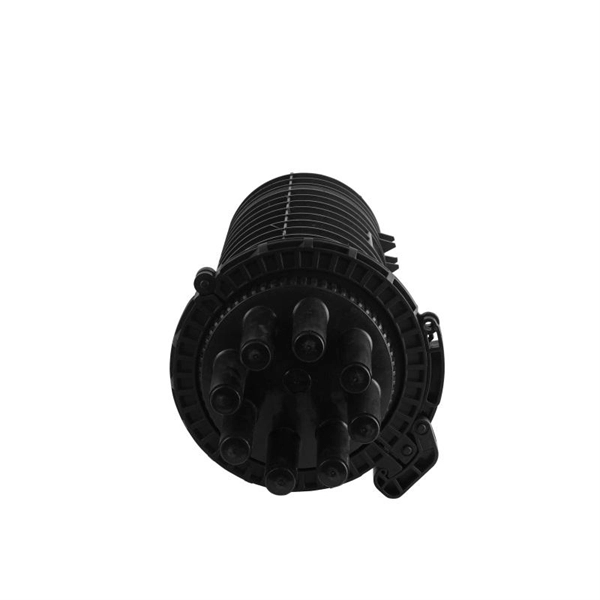
While a cut or damaged fiber optic cable can temporarily take your network down, it is possible to quickly fix the cable with the right tools. This wikiHow article will teach you how to splice a cut fiber optic cable back together with a fiber optic stripper and cutter and a fiber. To connect your fiber optic cable to a router, ensure you have the following: Fiber optic modem (ONT): Most fiber connections require an Optical Network Terminal (ONT), provided by your ISP. Compatible router: Verify that your router supports fiber optic input (look for an SFP or WAN port labeled. The fiber optic cable does not plug directly into a standard home router because the signal type must be translated. The fiber line terminates at the Optical Network Terminal (ONT), which is typically supplied and installed by the internet service provider. This specialized equipment serves as the. The process to connect fiber optic cable to router requires careful attention to detail, but I'll walk you through every critical step with the precision and clarity you deserve. Here's a step-by-step guide to help you through it. Understand the Basics Before diving in, familiarize yourself with the components involved:. See you soon! 🚀 How to connect a fiber optic cable to the router. Check compatibility: Before you begin, make sure your router supports fiber optic connection. Not all routers can connect directly to a fiber cable, so it is important to verify this information before continuing.
[PDF]

The table below is a Cross Reference for all Palo Alto Networks Hardware Accessories and includes the Palo Alto Networks SKU, RoHS Compliance, Harmonized Tariff Schedule, ECCN and License information. Choose an option Alt text (alternative text) helps when people can't see the image or when it doesn't load. Aim for 1-2 sentences that describe the subject, setting, or actions. This is used for ornamental images, like borders or watermarks. Short description for people who can't see the image or. The merchandise under consideration is an optical transceiver, part# EOLP-1396-10-X. This item is a single mode transceiver in a small form-factor pluggable (SFP) module for serial optical data communications with an operating data rate of 11. 3Gbps and transmission distance of up to 10 km. The. Currently, the U. import Harmonized Tariff Schedule (HTS) code for optical modules is 8517. HTS website https://hts. gov/,searching for "8517. 00" shows the result "General Free1/", which indicates that attention should be paid to 9903. All parts listed below are RoHS compliant and meet the requirements of the current RoHS 2. How to Reduce Optical Module Costs | SFP & QSFP Cost Optimization Guide-Industry News-Sate Optics-Network Connectivity Solutions! In today's rapidly evolving network environments, reducing operational costs is a top priority for data centers, telecom operators, and system integrators.
[PDF]
This integration is achieved through the use of wavelength division multiplexing (WDM) filters, which separate the transmit and receive wavelengths within the same fiber. These modules play a vital role in transmitting and receiving optical signals. TOSA ( Transmitter Optical Sub-Assembly), converts electrical signals into optical signals for transmission. In this mode, the WDM system transmits multi-wavelength optical signals in receive and transmit directions through separate fibers. Simple design and low requirements. If you're dealing with data centers, telecommunications, or AI networking, grasping the key parameters of an optical. In the era of 5G, AI, and high-speed data centers, optical modules serve as the core bridge for converting electrical signals to optical signals (and vice versa), enabling fast, reliable data transmission across networks. Among various optical module form factors, SFP (Small Form-Factor Pluggable). Fiber optic transceivers are key components of the fiber optic transmission network. They are designed in small form-factor with some integrated optical sub-assemblies which can be suitable for the high-density network. There are many SFPs available in the market with different features and. Most systems operate by transmitting in one direction on one fiber and in the reverse direction on another fiber for full duplex operation.
[PDF]

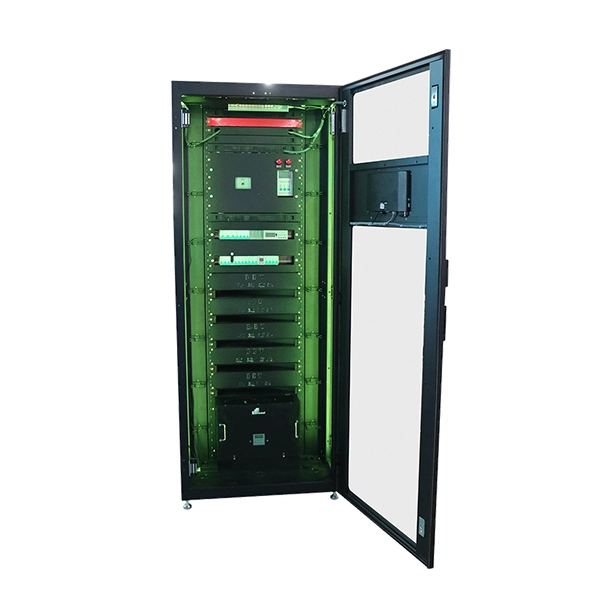
The good news is that network cabinet prices range from as low as $100 for basic wall-mounted units to over $3,000 for specialized outdoor models. However, understanding what drives these costs will help you make a smart buying decision. In this complete guide, we'll break down everything you need. Check each product page for other buying options. VEVOR 6U Wall Mount Network Server Cabinet, 15. 5" Deep, Server Rack Cabinet Enclosure, 200 lbs Max. 5". Explore our top-tier selection of Networking Cabinets and Racks designed to keep your IT infrastructure organized and secure. Whether you're setting up a home lab, a corporate data center, or managing network equipment for a small business, our collection offers robust and versatile solutions. Cabinets are used for storing routers, patch panels, switches and a wide variety of networking equipment and accessories. Network cabinets support large, modular network switches by providing additional space for cable management and. Network cabinets are enclosed systems designed to securely store, organize, and protect networking and IT equipment such as switches, routers, patch panels, servers, power strips, and cable management components. They allow users to secure their data and communication connections. The product will be reserved for you when.
[PDF]
Check 400G QSFP-DD price from the latest Cisco price list 2022. 400G QSFP-DD Transceiver, 400GBASE-DR4, MPO-12,500m parallel. The QSFP Optical Module Market is expected to grow from 3,060 USD Million in 2025 to 10 USD Billion by 2035. 6% during the forecast period (2026. The InnoLight's 400G QSFP-DD is on of the first 400G optical transceiver on the market and it allows to communicate up to 2km in PSM4. The InnoLight solution is based on the INPHI chipset, the IN010C50 PAM4 DSP, the four GaAs laser driver dies, and a TIA die, all designed by INPHI. The transceivers. FS 40G QSFP+ optical transceiver module solutions offer a full range of QSFP+ modules from 150m to 80km reach, and used for high-density switching, routing and data center applications. Click to get your 40G QSFP+ transceiver modules from nearby warehouses. Trusted by 260K+. Quad Small Form-Factor Pluggable Double-Density (QSFP-DD) offers twice as many high-speed electrical interfaces as QSFP28 while maintaining the same port density. When combined with higher transmission rates per electrical interface (28 Gbps to 56 Gbps to 112 Gbps), QSFP-DD optical transceivers can. • SR4 | SR8 | DR4 | FR4 | LR4 | LR8 | ER8 | XDR4 | PLR4 from $189. Explore Now! • Explore 400G/800G Ethernet Optical Transceivers for High-Speed Interconnect. Every transceiver is tested to the exact specifications of our customer's environment.
[PDF]

Identical Wavelength Transceivers must support the same wavelength at both ends to transmit data effectively. Mismatched wavelengths can lead to signal loss and degraded transmission. For instance, a 1310nm transceiver is incompatible with an 850nm one. When it comes to the connection between two fiber optic transceivers, the following four factors should be taken into considerations: wavelength, speed, fiber type, and the connection to switches. Mismatched wavelengths can. A CWDM SFP module is an optical transceiver that uses Coarse Wavelength Division Multiplexing (CWDM) technology to transmit multiple data channels over a single strand of single-mode fiber, helping networks expand capacity without deploying additional fiber. In practical terms, CWDM SFP modules are. XFP Optical Modules and SFP+ Optical Modules play a crucial role in modern fiber-optic networks. Although higher-speed technologies such as 25G, 40G, 100G, and even 400G Ethernet continue to evolve, 10G solutions remain widely deployed due to their balance of performance, cost, and reliability. SFP with different wavelengths work? I have to migrate off a cisco catalyst 4900 to a juniper mx960 but before I do that the optical transport needs to be changed. Is it possible for the link to work temporarily with SFPs with different wavelengths on each side? It will be DWDM ch 59 and ch 29.
[PDF]

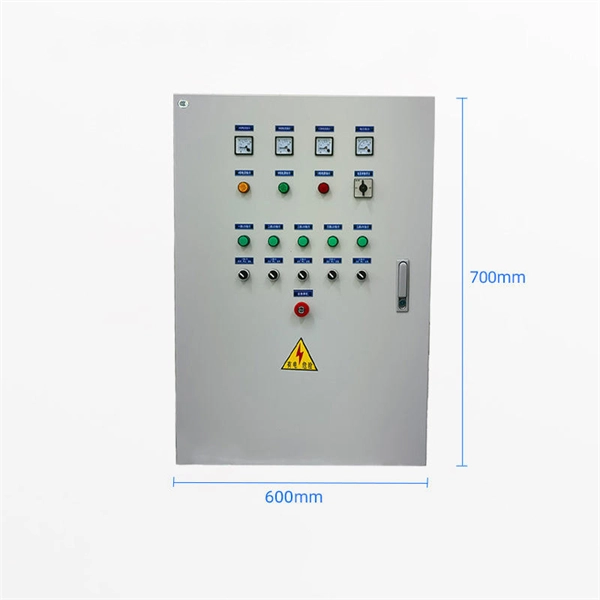
Therm-X is a specialist in thermal systems, temperature sensors, heaters, thermocouples, controllers and resistance temperature detectors (RTDs) for renewable technologies. We have designed and co-developed temperature sensitive process equipment for solar, fuel cells, and other. In this comprehensive guide, you'll discover how temperature monitoring systems optimize photovoltaic power plant performance. We. Our Temperature Sensors ensure reliable and accurate temperature readings in all conditions. Constructed with premium materials and calibrated for precision, these sensors are designed for durability and stability, providing dependable performance over time. This TI Design addresses the key need of a highly cost-optimized monitoring and communication subsystem for solar module level power electronics (MLPE). This design. In addition to the standard line, ACS is able to offer customized solutions thanks to its more than 60 years of experience in designing customized environmental simulation chambers, its technical know-how and the close attention given to the requests of all our customers. Example of a chamber. We have designed and built simple custom temperature control solutions from single zone 150W panels up to large +850kW multi-zone/multi-circuit panels with a full HMI and plant-wide DCS integration. Below are some custom features we can add to your panel. Contact us to discuss your specific.
[PDF]

1x9 transceivers are the earliest and oldest-style optical modules. Initially created in the 1990s, they aimed at 100M/1G Ethernet, Fibre Channel, ATM, FDDI, SDH/SONET, and video applications. Then, they were gradually replaced by more advanced and intelligent GBICs, SFPs . Next, we will introduce the three main features of the optical module: The package form is the most important feature of the optical module. The earliest package form was 1*9, and then GBIC, SFF, SFP, Xenpak, X2, XFP, etc. came one after another. Due to the limitations of the era, the 10G optical. An optical module is a typically hot-pluggable optical transceiver used in high-bandwidth data communications applications. The unsung heroes behind this "data voyage" are optical modules—the "optical communication translators" that precisely convert electrical and optical signals. From. Before the 1990s, there was no concept of the optical transceiver industry, and equipment manufacturers independently designed and developed optical transceivers with no uniform standards for size and mechanical interfaces, resulting in poor compatibility and connectivity issues for telecom.
[PDF]
A passive optical network (PON) or Gigabit Passive Optical Network (GPON) is a point-to-multipoint (P2MP) network that uses a combination of active transmission equipments and passive cable components to provide network connectivity to end user's devices. A passive optical network (PON) is a fiber-optic telecommunications network that uses only unpowered devices to carry signals, as opposed to electronic equipment. In practice, PONs are typically used for the last mile between Internet service providers (ISP) and their customers. Central to the GPON system is the Optical Line Terminal (OLT), the core device responsible for. As the demand for high-speed internet and fiber-to-the-home (FTTH) services continues to grow, Gigabit Passive Optical Networks (GPON) have emerged as a dominant technology in the access network landscape. The primary use of these modules is for fast data transmission over fiber optic cables, which is made possible by the GPON standard, which can handle up. A GPON network is capable of transmitting ethernet, TDM (Time Division Multiplexing) as well as ATM traffic. A GPON network consists of OLT (Optical Line Terminals), ONU (Optical Network Unit), and a splitter. The splitter will divide the signal when needed. In essence, a PON is a fiber-optic system that delivers data from a single source to multiple endpoints using only.
[PDF]