
Cable tray pricing depends on materials, coatings, size, supplier margins, and order quantity —plus hidden costs like shipping and installation. This guide breaks down everything buyers need to know, from price trends to cost-saving tips. Cable trays are vital in electrical installations, providing secure pathways for power, communication, and control cables across residential, commercial, and industrial settings. Understanding the cable tray installation cost per meter is essential for effective budget planning. The average cable tray price per meter ranges from $2 to. For the best experience on our site, be sure to turn on Javascript in your browser. We offer complete kits to provide you with cable tray ready to install under new or existing raised floors based on the unique requirements at your facility. The cable tray installation price varies significantly depending on the type of cable tray selected. Choosing the right cable. The wire mesh (or basket) trays are made of fine steel wire welded to form a tray. These are the lightest and most affordable ones to purchase. They can be used wherever there are numerous small internet cables in the data centers or the offices. The price is based on standard length of the cable tray which is 2.
[PDF]

As pluggable I/O data rates increase, the need to efectively limit EMI emissions and heat generated by fiber optic transceivers simultaneously arises. Typically this is done through an EMI containment vehicle such as a sheet metal cage or die cast housing. Legal status (The legal status is an assumption and is not a legal conclusion. Google has not performed a legal analysis and makes no representation as to the accuracy of the status listed. ) Current Assignee (The listed assignees may be inaccurate. In this guide, we will cover everything from what causes heat, to monitoring your SFP module temperatures in real. The developments introduced in the optical communication systems have been focused in 3 main objectives: increase of the propagation distance, increase of the transmission capacity (bitrate) and reduction of the deployment and operation costs. The achievement of these objectives was only possible. With the growing global deployment of Fiber-to-the-Home (FTTH) networks driven by the demand for ensuring high-capacity broadband services, mobile network operators (MNOs) face challenges of excessive energy consumption (EC) of wired optical access networks (OANs). This article will focus on I/O. Fiber optical transceiver is one of the key components of the fiber optic communication systems. The fiber optical transceiver modules convert electrical signal and optical signal to each other to exchange information.
[PDF]

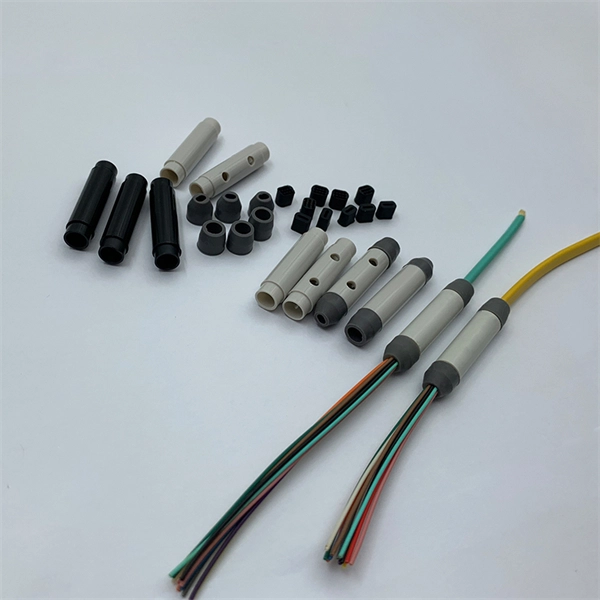
However, by using heat shrink tubing, it's possible to establish a tight, reliable seal around cables and wires, essentially providing a waterproof finish. This helps deter the risk of water-induced damage, helping to extend the durability and lifespan of your electrical systems. Outdoor junction boxes are exposed to harsh environmental conditions, including rain, snow, UV radiation, and fluctuating temperatures. Without proper weatherproofing, moisture can penetrate the enclosure through cable entries, mounting holes, or compromised seals. The consequences of poor. Heat shrink tubing is commonly used for waterproofing electrical connections, particularly in applications where exposure to moisture is a concern. Here's how waterproofing through heat shrink works: Selecting the Right Tubing: Choose heat shrink tubing that is specifically designed for. Heat shrink tubing is an indispensable thermoplastic sleeve used in wiring and cable management. It is a “must-have” insulating tool for electricians and engineers, providing reliable protection and a secure seal around wires and connectors. The outer layer is typically made of a durable, flexible polymer material (often polyolefin), which is designed to shrink when exposed to heat. This simple technology typically involves a polyolefin sleeve that has been expanded and then set with a memory to shrink back to its original, smaller size when.
[PDF]

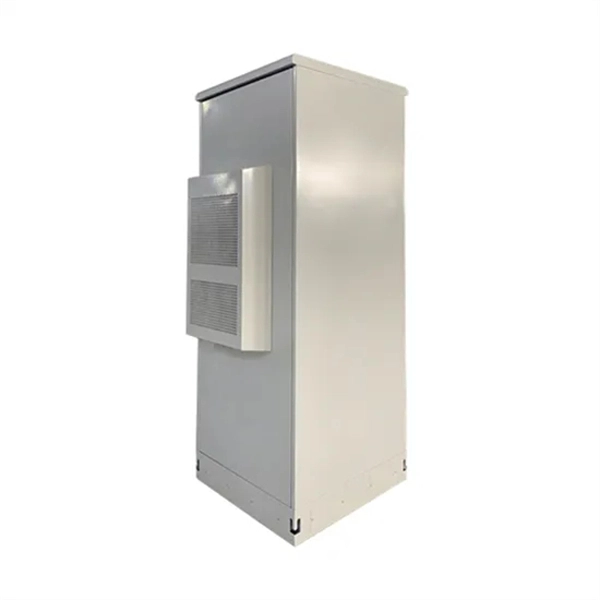
Key cost drivers include panel amperage, indoor vs outdoor location, wiring length, and whether a full panel upgrade or rerouting is needed. Buyers typically pay for a full panel replacement, including labor, materials, and permits. The article outlines cost ranges, per-unit pricing, and practical. Typical cost ranges for replacing a distribution box or service panel in the United States vary widely based on panel size, amperage, labor, and whether a full service upgrade is needed. This article outlines the cost factors, price ranges, and practical budgeting advice for a U. The price depends on electrical code upgrades, permit. Check with a local pro for your specific job. The amperage your home needs and the type of panel you choose will determine your final project cost for the replacement. You should budget for permits. The average cost to replace a breaker box is $1,475 with most homeowners spending between $1,287 and $1,707. A low-amp subpanel costs from $500 to $1,000 while a 200-amp panel upgrade runs up to $4,000. Total costs depend on the type of home, the number of circuits, and the amperage. Our homes are. Enter panel size and installation cost details to estimate the total cost of installing an electric panel. Upgrading or replacing an electrical panel is a significant investment, and understanding the costs involved is crucial for homeowners and contractors alike. Our Electrical Panel Cost.
[PDF]
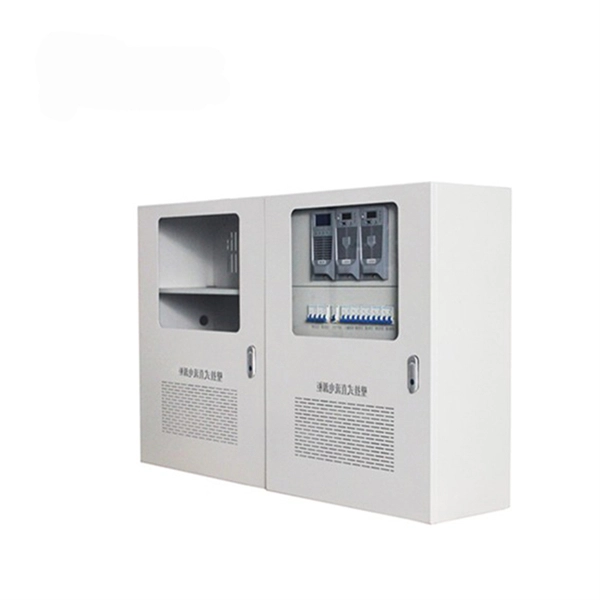
Choose the right box based on environment (indoor/outdoor), load capacity, and durability. Check for proper IP/NEMA ratings and material quality. Ensure safe placement: install in dry, accessible areas with good ventilation and at appropriate height (typically ~1. Practice good wiring: secure. An electrical distribution box, also known as a power distribution box, panelboard, or consumer unit, is the core of an electrical system. It has three categories: residential, commercial and industrial electrical distribution boxes, all of which play important roles in their respective electrical. When you install a distribution box, you need a variety of tools to get the job done safely and efficiently. To install distribution box systems, you'll use hand tools such as screwdrivers and pliers. Wire strippers are essential when you install distribution box wiring. A measuring tape and. This guide offers an in-depth exploration of installing electrical distribution boards, highlighting essential steps, safety measures, and the integration of business intelligence tools to optimize your work. Just like travelers need clear pathways and safety protocols, your electrical circuits need proper management to prevent chaos. The National Electrical Code (NEC) requirements might seem like bureaucratic.
[PDF]

Choose the right box based on environment (indoor/outdoor), load capacity, and durability. Check for proper IP/NEMA ratings and material quality. Ensure safe placement: install in dry, accessible areas with good ventilation and at appropriate height (typically ~1. In this guide, we'll break down everything you need to know to install a distribution box correctly and confidently. It has three categories: residential, commercial and industrial electrical distribution boxes, all of which play important roles in their respective electrical. Here at Allied Moulded Products, a leading manufacturer of electrical boxes, we want to help you ensure your electrical boxes are installed safely and correctly. Whether you are installing our tried-and-true Fiberglass electrical boxes or any of our flexBox products, we'll discuss some key do's and. In modern electrical systems, cable distribution boxes (also known as electrical distribution boxes or distribution boxes) play a crucial role as the key hub for managing, distributing, and protecting circuits. Whether you are upgrading the electrical system in an old home or planning your electrical needs for new construction, it helps to draw out your plans on paper. You don't have to create a to-scale.
[PDF]
Before installation, it's important to know what makes up a distribution box. Let's break it down into two main parts: the outer shell and the electrical parts inside. The enclosure protects the electrical co.
[PDF]

This guide covers the critical steps, from selecting the right electrical cable tray and performing accurate cable fill calculations to managing a safe cable pull through and ensuring all bonding and grounding requirements are met. Whether you're building a commercial setup or upgrading an industrial plant, proper cable tray installation ensures neat wiring, safe access, and easy maintenance. But before you lay the first tray or clamp down a single cable, you need a solid plan. This guide breaks down the process step by step. Several mounting. Installing a cable tray system requires careful planning to ensure it can support the weight of the cables and adheres to electrical safety codes. Here is a step-by-step guide on how to install a standard metal cable tray system (e., ladder or perforated type). When properly selected and installed, cable trays simplify routing, improve accessibility, and support future expansion while. Getting cable trays set up right and keeping them in good shape is vital. It stops issues, keeps things working, and saves you money over time. This guide will walk you through the key points for Cable Tray Installation and Maintenance, making sure your cable management systems are strong and.
[PDF]
Step-by-step cable tray and conduit installation method with safety, quality and inspection procedures as per IEEE standards. But before you lay the first tray or clamp down a single cable, you need a solid plan. This guide breaks down the process step by step. Plan the Route Before You Drill No installation should start without a plan. Mark the cable tray route based on your electrical cable tray design and site. This guide covers the critical steps, from selecting the right electrical cable tray and performing accurate cable fill calculations to managing a safe cable pull through and ensuring all bonding and grounding requirements are met. For licensed electricians, mastering these principles is essential. This method statement describes a detailed procedure for properly installing cable trays and conduits for the Feeder System. The objective is to ensure safety, quality and compliance during the. Below is the detailed cable tray installation method statement not only for cable tray but also applicable for GI ladder and trunking for indoor and outdoor applications and in service rooms like pump rooms, electrical rooms and plant rooms etc. The Cable Tray system is installed in electrical rooms, plant rooms, and service corridors. The key requirements for cable tray installation include: Incorrect installation can lead to overheating, cable damage, or system failure. This is why proper planning and execution are.
[PDF]
For a straightforward installation of a single standard box in an accessible location, homeowners often see $120-$260. Projects involving new or upgraded circuits, larger panels, or difficult access commonly run $800-$1,600, with high-end setups surpassing $3,000 in some. Homeowners typically pay a broad range for electrical box installation, driven by box type, wiring complexity, and local labor rates. This guide covers cost, price ranges, and practical budgeting for standard electrical box installation projects. The cost includes materials, labor, and possible inspections or upgrades to meet code requirements. This article breaks down the price so buyers can estimate a realistic. Homeowners typically pay a wide range for installing or updating an electrical box. Get free estimates from electricians near you or check out our pricing guide below.
[PDF]
Cable tray pricing depends on materials, coatings, size, supplier margins, and order quantity —plus hidden costs like shipping and installation. This guide breaks down everything buyers need to know, from price trends to cost-saving tips. Cable trays are vital in electrical installations, providing secure pathways for power, communication, and control cables across residential, commercial, and industrial settings. Understanding the cable tray installation cost per meter is essential for effective budget planning. Costs vary based on. The cable tray installation price varies significantly depending on the type of cable tray selected. The average cable tray price per meter ranges from $2 to. This blog post dives deep into the cost considerations of cable trays compared to other commonly used methods, helping you make an informed decision for your next project. The upfront cost of purchasing the cable management system itself. Installation cost: The labor and resources required to. Jeetmull Jaichandlall (P) Ltd. is one of the trustworthy Cable Tray Manufacturers in Venezuela that is here to fulfill all your wire mesh and netting tools needs. We believe in building fruitful business partnerships. The price structure typically reflects the material composition, whether aluminum, steel, or.
[PDF]

This guide walks through a complete KVM installation on Ubuntu 24. 04 LTS, from verifying hardware support to creating your first VM. Every command and output shown here was captured on a real system. KVM (Kernel-based Virtual Machine) is a virtualization technology integrated into the Linux kernel. It allows you to run multiple virtual machines (VMs) on a single physical host. Ubuntu, a popular Linux distribution, provides an excellent platform for setting up and managing KVM virtualization. If you're looking for RHEL-family coverage, see the KVM installation guide for Rocky. Whether you're running the stable Ubuntu 20. 04 Noble Numbat, or experimenting with Ubuntu 25. 04, these steps will walk you through a full KVM setup — from system checks to launching your first VM with virt-manager GUI. KVM (Kernel-based Virtual Machine) is a popular virtualization. KVM can mean two things: a KVM switch, which lets you control multiple computers with one keyboard, monitor, and mouse, or Kernel-based Virtual Machine, a Linux feature that turns your system into a hypervisor for running virtual machines. 04 is essential for both development and production environments.
[PDF]

The total cost of installing a touch screen kiosk depends on the hardware configuration, software requirements, installation complexity, and ongoing support plan. A basic informational kiosk with a single touch display runs $3,000-$5,000 fully installed. Well-planned installs reduce downtime and future rework. Cutting corners here usually costs more later. The difference isn't just screen count. It's reliability, flexibility, and how much work the system saves your team. Digital. Buyers typically pay for a full panel replacement, including labor, materials, and permits. Key cost drivers include panel amperage, indoor vs outdoor location, wiring length, and whether a full panel upgrade or rerouting is needed. This article outlines the cost factors, price ranges, and practical budgeting advice for a U. The price depends on electrical code upgrades, permit. Whether you're expanding, adding new equipment, or just trying to stay compliant, an electrical panel upgrade is often the first step. But that leads to the big question: how much does it cost to upgrade an electrical panel? Let's break it down. Whether you're in retail, industrial, or digital signage markets, understanding the PCAP touch screen cost is essential for making.
[PDF]

